During my travels I have encountered many different styles of period pavilions. This article contains some of the more common tents used in the SCA and what to expect from various styles.
If you plan to build a pavilion, you may want to peruse the Medieval Pavilion Resources website, as well as the Stephan's Florilegium file "tents-weather-msg". Both are good places to get started. There is also the Medieval Encampments elist on Yahoo!. If you subscribe to the elist, however, please look through the files, photos, and archived message threads before you start asking questions on the list. You'll probably find answers to most of your questions there.
Many people have many available articles as well as opinions on how things should be done. Look over everything, figure out what's best for YOU, and then build a scale model using all the proper seams and such that the full-scale tent will utilize. Once you've figured out how things go together and know for certain what you want, dive in and create greatness!
Images are collected via Google image searches & linked to the original site. If an image is yours and you wish it removed or you have questions about this webpage, please contact me and I will graciously oblige. [Ceara@HouseBarra.com]
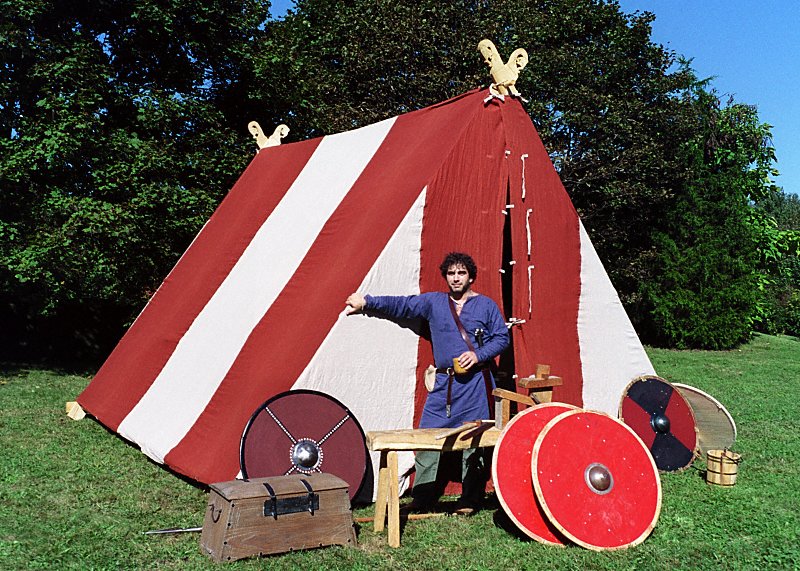
Viking A-frame
|
The Viking A-Frame tent (as we commonly know it in the SCA) is a conjecturally period pavilion based on archeological finds and extant architecture. It consists of 10 pieces of lumber for the frame: 2 side rails, a ridge pole, 2 ends, and 4 cross-beams.
The canvas pattern is easy; it consists of a rectangle and 4 triangles. It does not require stakes, so it can be set up on anything, even in a paved parking lot. An interior cross-rope support stabilizes the frame to prevent leaning. Generally there is not a lot of head room unless the tent is reasonably large. A good average size would be 16 feet square at the base and 12 feet tall.
Because the canvas is draped over a wooden frame instead of being held up by tension, the interior rope support is needed to help prevent the canvas from sagging excessively when wet. If the weather is stormy, it is a good idea to find some way to stake it down, however, as this design has been known (albeit rarely) blow over in extrememly high winds, particularly if it is in an open area.
Alternatively, if your Viking tent is large enough, you can also use it to hide a modern tent. Simply set the modern tent inside the Viking tent for discretion and shade from sun and rain.
Setup: Can be done by 1 person, but 2 is much easier and definitely safer.
|
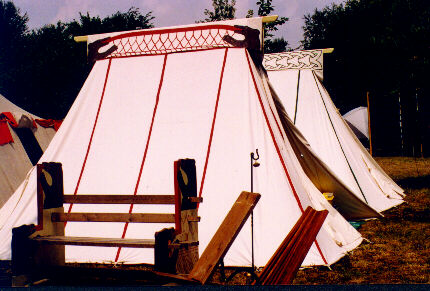
Anglo-Saxon Geteld
|
The Anglo-Saxon Geteld is a documentable tent held up by two upright support poles and one ridge pole. It is staked to the ground and uses no guy ropes.
The canvas pattern is virtually the same as the Viking A-Frame, except that the ends splay out and the ridge is a little different. The ridge is a sleeve sewn at the apex for the ridge pole to slide through. This allows the doors to overlap completely, unlike the A-frame tent where the ridge pole portrudes slightly at the ends of each peak.
The Geteld stands up well in extreme weather. In period, the average size was probably about 9 feet tall, but for modern use a good average size is about 12 feet tall and 16 feet wide at the base. Like the A-frame, head room is in short supply.
Setup: Can be done by 1 person, but much easier with 2.
|
Bell Wedge
(aka Double Bell Wedge)

|
The Bell Wedge is a later period (circa 13th-16th century) documentable pavilion which bears resemblance to both the Viking A-Frame and the Geteld. The center is rectangular, the ends are conical, and it is supported by two upright poles and one ridge pole. With the Bell Wedge however, the poles are entirely inside the tent, except in occasional examples where pennons or gilt finials adorn the tent and are mounted on spikes which portrude from the upright support poles through the roof of the tent.
Generally the Bell Wedge only has one entry door on the side. Often a flat shade fly is attached, or the side of the tent opens with the door flap lifting to be a flat shade fly. It handles inclement weather very well, tensioned by stakes and optional high-wind lines. The conical ends allow a little more useable space inside.
Setup: Can be done by 1 person, but much easier with 2.
|
Marquis


Square Marquis with splayed walls
and adjoined shade fly
|
A Marquis tent is characterized by its use of perimeter poles and guy lines. It can have straight or splayed walls and can be round, square, rectangular or oval. It can have one center support pole or two. Generally speaking however, when someone mentions a Marquis tent, they are referring to either the rectangular or oval version. The rest are usually referred to by their shapes (round or square).
The roof of an oval Marquis tent is essentially the same canvas pattern as the Bell Wedge (without a door opening). The roof of the round Marquis is conical.
The number of perimeter poles depends on the size of your pavilion. If you use more than one center support pole, you will need to use a ridge pole. High wind lines are also adviseable for inclement weather. Because of the straight walls and their resistance to wind, keeping tension on all guy lines at all times is important. I have a 12' x 15' marquis that utilizes two upright supports, a ridge pole, and 12 perimeter poles. I have to check the lines at least once a day, or more often if it is windy. The marquis is very versitile for space but it is also a bit high-maintenance.
There are some opinions that some Marquis styles (like the oval or round) do not need perimeter poles. These usually use VERY long guy lines, which can more than double the footprint of your tent, and the tent tends to look saggy which is bad if its rains. Personally, I'd rather make better use of a smaller space and not have to worry about leaks due to sagging. As today, in period there were plenty of ways to put up a tent. Use what works best for you; either way is period.
Occasionally you will see Marquis tents with splayed walls instead of straight. The splayed walls give the pavilion a little more stability and room on the inside. Generally a marquis' walls have hooks to attach them to the roof, rather than being sewn on. This makes it easier to set up and transport the tent. Many people use the marquis as a day shade without the walls. Like the Bell Wedge, some folks have upright supports with spikes on the end that portrude through the roof. This gives a place to put flags, finials, and to secure high wind lines.
Setup: For the square (single center pole) Marquis, setup can be done with one person. For larger tents, at least 2 people; but it gets increasingly easier with more people to help. |
Yurt/Gher

|
This nomadic tent is not only period, it is also still in use today by nomadic tribes of the Middle East. The perimeter is a retractable grid that looks something like the face of a wine rack (only larger) and roof spokes set into a center ring. The cover traditionally is made of woolen felt, but for SCA purposes is usually canvas. Often the Yurt is fitted with a short wooden door.
While I have seen many of these at events, I do not know much about them as far as construction and set-up is concerned. I have been told that 2-3 people can put one up, but generally the more people involved the easier it is. From what I have seen, they weather storms beautifully. There is no vertical center pole and no guy ropes or stakes, but it does utilize ropes to hold the canvas onto the lumber-heavy, interior frame. The Yurt seems to usually have a fairly low profile. Tall people usually have to duck to get through the doorway, but once inside there is ample head room. Some Yurts that I have seen have a 'belly band', a wide band that belts the girth of the tent and helps to hold the canvas on and the frame in place.
What I do know is that the Yurt requires a gratuitous amount of space for travel and appears to require a lot of muscle to assemble. It's no wonder that the Mongols had huge wagons to haul these things completely assembled...the rich Mongols, anyway!
Setup: The more, the merrier!
|
Single Pole Spoked Pavilion
(aka Spoke & Hub or Wagon Wheel)

|
This conjecturally period design based on extant artifacts, paintings and illuminations was conjured up by Master Dafydd ap Gwystl. It is very easy to set up and holds up beautifully in inclement weather, even high winds. With a conical roof and splayed walls that stake to the ground, it is supported by a center pole on which rests a hub. Spokes fit into hub and hold out the sides of the tent. The number of spokes depends on the size of the pavilion.
Setup: 1 person, unless the tent is particularly large, then 2-3.
|
For more articles on period pavilions including history and plans for building, visit Medieval Pavilion Resources, a huge site with everything you ever wanted to know about period tents. Includes articles, history, plans, links, photos/pictures, and information.
Table of Medieval and Renaissance Tent Pictures, a timeline and description of various pavilions with documentation.
For pictures of reproductions, visit the Medieval Pavilion Resources' Gallery of Tents for a few examples.
More photos can be found by browsing through various SCA and SCA related sites, especially those with articles concerning the Pennsic War.
Or, you can run a Google Image search for "Medieval Tent" or "Medieval Pavilion".