For images of their version of this shoe, click here.


| This type of one-piece shoe was used by many different cultures, especially the Celts and the Germanic tribes. I'm calling them 'Bog Shoes' because many examples have been excavated from bogs where they were lost or thrown, and part of my design is from a shoe I found in a puddle at TYC. These shoes are easy to construct, comfortable to wear and add a lot to early costumes. Women's shoes can be made of lighter weight leather for dress wear and cutouts can be made along the sides for decoration. For winter you can make an insole of heavier leather and line the inside of the shoe with fur. Glue the fur to the leather while the shoe is flat, keeping the fur away from the lacing areas in the front and the overlaps in the back. You could also use a skin with .the fur left on and turn the fur to the inside. | |
| I've tried to keep the pattern as large as possible because I hate to try to enlarge patterns from something the size of a minimissimi*. The pattern given fits a woman's size 7 to 9 approximately. To enlarge the pattern to your size, draw around you foot on a large piece of paper and then go down to the local library and borrow their overhead or opaque projector. Enlarge or decrease the pattern projection until your foot fits the foot on the pattern and you are in business. A good way to do this would be to get drawings of feet from several group members and do a whole bunch at time. [The pattern is not shown to scale but was scanned in with a grid. Enlarge pattern 400% so that each square equals one inch. This pattern fits a woman's 91/2.] | pattern removed at the request of Medieval Moccasins. For images of their version of this shoe, click here. |
| Instructions: 1. Enlarge or decrease the pattern to your size. Cut a template from vinyl and lace it as shown in steps 3 and 4 to check the fit before cutting out the leather. Adjust the cutting as needed and keep the vinyl for your pattern. | |
| 2. Cut out the shoe from light to medium weight leather, remembering to reverse the pattern for one foot, since the pattern isn't symmetrical. Punch the holes as shown on the pattern and trim the holes on the flaps to long ovals as shown in Figure 1. |  |
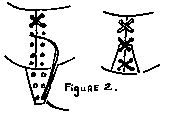
| 3. Lace the heel pieces together as shown in Figure 2. |  |
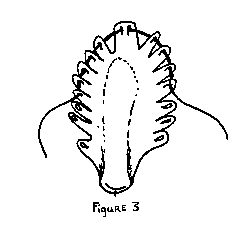
| 4. Place your foot on the shoe piece with your heel against the laced seam. Lace the toe flaps together as shown in Fig. 3, leaving the top three flaps over the instep unlaced, and then tie the laces to hold the flaps together. Lace the remaining flaps together by criss-crossing the laces. | |
| For a really well-fitting shoe dampen the leather and then wear them until they dry. Or you can wait for this to happen at the next wet event and let nature take its course. Even in summer these shoes are more comfortable if you insert an insole. You can cut some of fake fur (trace around your foot and use that shape to cut some) and place them in the bottom of the shoe. To be period you could stuff the shoes with raw wool and let it become felt naturally, or use dried grass. *minimissimi --a tiny Roman bronze coin about as big around as the end of a pencil eraser and comparable to the patterns found in some SCA publications. |  |