 |
   |
 |
 |
   |
 |
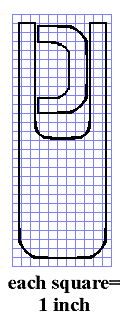
The pegs are much easier to make than you would expect. Make about ten peg blanks about 2" long and 3/8" square. I used olive wood, but any very hard, dense wood will do. Avoid using the heart-wood of the piece, as it will break under the stress of tuning. Fasten the peg blank in a vise. Using a rasp or bastard file, trim off the corners, making the peg somewhat conical. Be sure to leave a square end on the process until the peg fits snugly into the "fitter". Make all ten pegs this way. You will then need to trim each peg to fit its specific hole in the cithara. Save the extra pegs. A small hole will have to be drilled into each peg for the string.
The end piece is basically a knob attached to a dowel, which is glued into a hole at the end of the main assembly. I used a wooden wheel and axle off my daughter's old wooden train set! The tail piece is of the same wood as the pegs. The bridge can be out of bone (see earlier issues for working with bone) or the same wood chosen for the pegs and tail piece. The bridge is glued onto the main assembly. The easiest way to learn how to fasten the strings is to study several guitars, violins, mandolins, etc. Again, your local music craftsman or music store can help here. The tail piece is not glued to the cithara, it is suspended by the six strings on one side and a loop or string going from one hole on its narrow end around the knob on the end of the main assembly, and back to its other hole. The final step is to make a tuning tool. Pick up your 'fitters' and drill a 1/4" hole in the other end of each of them. Use a narrow chisel and turn the circular hole into a square one, just over 1/4" on a side. After making all the pegs, when placed in their respective holes, the same height, used the square "fitter' and your file to make all peg tops the same size. Your square fitter now becomes your tuning tool. Use it to twist the pegs in their holes. Put the extra tuner with your spare pegs. Here are some optional, but highly decorative touches. Carve small designs on the pegs (being careful not to ruin the fit of the tuning tool). while you are carving, add some designs to the tuning tool. Use a decorative lanyard thru the peg-fitting hole to fasten the tuning tool to your belt. The original instrument had metal plates to support the joint between the main piece and the arm. Make or find appropriate metal panels and affix them. The bridge can be a combination of bone and wood, look at some modern ones for inspiration.
Sand, sand, sand! Yes, again. Stain scrap pieces of each type of wood and filler. If some are noticeably darker than the rest, put a light coat of polyurethane on the darkest type, sand most of it off and stain. Experimenting with the scrap wood will enable you to even out the color. The mistake most novice woodworkers make is to get impatient to finish when 'just sanding and staining' is left to do.
Please refer to Master Orrick's article "Tuning the Sutton Hoo Instrument" elsewhere in this issue for details on stringing, tuning, and playing this instrument.