Warping Your Loom
Erratu: We left out one step in our instructions for building your warp weighted loom. After you have woven a while you will run out of room for weaving. To wrap the material around the beam so you have room to weave some more, you will need something to hold the beam in place and keep the material from unrolling. Drill a hole into the outer part of the beam as shown in Figure 1. This should be about 1 ½ inches deep and large enough to hold a ¾ to 1” dowel. Glue the dowel in place. This acts as a brake against the wall so the material cannot unroll.

Warp: The support threads, the ones you tie to the weights
Weft: Thread that is passed between the warp threads and holds it together to form cloth
There are two ways to attach warp to the beam of your loom.
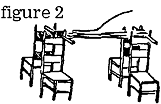
The first is to measure your warp threads around a header cord and sew the header cord to the beam, spacing the warp threads evenly. I use four ladder-backed chairs and a broomstick. Tie the header cord to the backs of two of the chairs and place a broomstick over the the backs of two more (figure 2). The distance between the two sets of chairs should equal the length of the finished warp. Attach your ball of warp to the broomstick and unwind the warp until you reach the cord. Go over the broomstick and unwind the warp until you reach the cord. Go over the broomstick and back to the cord. You are using a figure 8 pattern and if done correctly, that is how your warp will appear if viewed from the side.
When over the broomstick and back to the cord. You are using a figure 8 pattern and if done correctly, that is how your warp will appear if viewed from the side.
When you have a s much warp as you need (10-16 pairs to the inch is a good start) tie the warp end to the broomstick and break off the ball. The next part takes two people. Run your hand along the broomstick and gather the threads on top together in your hands while your helper does the same thing with the bottom threads. Cut the threads at the broomstick and tie the bottom bunch into a loose knot, being careful to retain the crossing. Separate the top bunch into four of five sections and chain each section to keep it from tangling. (figure 3) When you have finished with the top bundle, chain the bottom one in the same manner.
Tie the ends of the header cord to the uprights of the loom near the beam. Thread a large needle with heavy cord and starting at one end, sew the header cord to the beam, spacing the warp threads evenly. (figure 4)
The other way is to attach you warp is to make a tablet woven band and have the weft of the band become the warp for the loom. See Collingwood or Hoffman for ideas on how to do this.
Once you have completed attaching the warp, place the rear threads behind the shed rod so they hand down straight.
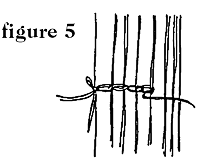
Place the front bundles on top of the beam so they are out of the way. * Loosen the first back bundle, unchain and attach the first 19-15 warp threads to a weight. The weight should hang just above the floor. Continue attaching weights until the whole back is weighted. Tie a heavy cord to one upright and chain the cord across the warp to help keep the warp even (figure 5). Fasten the cord to the other upright. Place the from threads in from of the shed rod and repeat the procedure from “*” with the front threads.
The last thing you need to do is to knit the heddles. You will need a ball of string (you can use the extra warp thread if you wish). Heddles attach the back threads to the heddle bar to form the second shed.
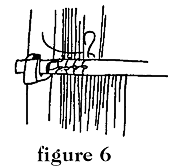
Attach the cord to the heddle bar on one side. You will pass the cord between the front warps, around the back of the back one and back to the heddle bar where you will secure it with a loop. This sounds more complicated than it is. Figure 6 shows how it is done.
When you have completed this you are ready to weave. Run your hand over the top wrap to separate it from the back. With your fingers feed a length of weft thread between the front and back warp and push up towards the bar. Pull the heddle rod forward and place it in its notches. This forms the second shed. Again feed the weft thread through the shed. You will be going from side to side. Push the heddle bar back to its original position and bring the weft thread across again. You will need to beat the weft up toward the beam from time to time to form a tight cloth. Use your fingers, a yardstick, hair-pick or a weavers' sword (looks like a child'd toy sword except that that handle is offset. (figure 7)
When you have no room left to weave, loosen the weights and turn the 'crank' to wrap the material around the beam. Tighten the weights and continue. Good luck. If you are serious about this, I highly suggest you read or at least browse through Hoffman's book.
Sources:
Broholm, H. and Hald, Margarethe Costume in the Bronze Age in Denmark Arnold Busck, 1940
Hoffman, Marta The Warp Weighted Loom Robin and Russ Handweavers, 1974.
Back to Early Period #3 |
Back to Early Period Index |
Back to PastTimes


