This armor design is taken from Medieval Costume, Armor and Weapons (1350-1450) by Drobna and Durdik, (Paul Hamlun, Ltd., Westbrook House, Fulham Broadway, London), 1958; plate 76 part II #6. While it is based on a later period style, it goes well with early period fighting gear. Leather arm armor was worn by the Roman gladiators.
To construct the leather arm armor you will need:
10-12 square feet of 8-9 ounce leather
enough sole leather to make 2 elbow cops
30 large rivets
8 split or screw post rivets
8 buckles (½ inch or 5/8 inch)
leather dye and sponge or daubers
rivet setter
rotary punch
a beveller is optional but it helps dress up the leather and makes it look a lot nicer
posterboard for enlarging pattern pieces
pen for writing on leather
waxed nylon thread
rawhide mallet
2 needles with large eyes
a piece of metal to peat on to set the rivets
Before starting read all the instructions. This keeps you from being surprised as the first pair can be a little tricky. The first thing you will want to do is enlarge the patterns. Draw the pattern outline by carefully reproducing the line within each box of the small grid in the corresponding box of the large grid.
Construction:
Trace the pattern onto the leather, making sure to flip the rearbrace and vambrace pattern so you will have a right and left arm. Cut out the leather pieces and bevel or use an edge finisher on all the leather pieces. It makes a lot nicer finish. Punch holes where indicated and dye the leather pieces.
Rivet the shoulder cap and 4 leaves together , one on top of the other. See illustration. **NOTE**: Before riveting this to the rearbrace, make sur this fits your upper arm.
You may need to add an extra leaf. Rivet the shoulder piece to the rearbrace with the rearbrace underneath.
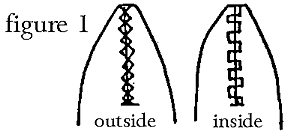
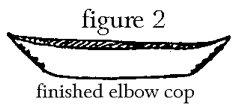
The elbow cop pattern piece has a V-shaped split in either end. Punch an even number of holes on each side of the V and sew together using waxed linen thread. I use a stitch that looks like figure 1. When finished, the elbow cop will curve up on each end. (figure 2).
Now use split rivets or screw post rivets and rivet the elbow cop to the rearbrace so that the elbow cop is on the outside. The longer of the 2 V's goes on the outside of the arm.
Now you are ready for the vambrace. Use split rivets or screw post rivets to put the vambrace on, leaving the elbow cop on the outside.
Make 6 straps and buckles. Make 7 or 8 holes in each strap plus some for the rivets. Buckle the strap and buckle ends together about midway. Have someone help you hold the rearbrace together and place the buckles and strap in its proper place. Using a mini-punch or a drill, make a hole in the rearbraces and set the buckles and straps. Do the same for the vambrace.
The final step is to make the strap for fastening the arm harness across your chest. Make a buckle part of a strap about 8 inches long. Now make a long strap that is long enough to attach to the other hole in the shoulder cap, reach around your back under your arm and back around to meet the buckle on your chest. This is what holds the arm up.
I wear a basketball elbow pad on each elbow under the leather cops. If you want you can pad the entire harness. These arms work great and move better each time you use them.
Click here for pattern pieces.

Viking Leather crafts can provide you with leather armor at affordable pries. You can order them finished or as a precut and prepunched kit. Other types of leather armor are also available, so write for a brochure.
Articulated arms (leather cops)......$60
Articulated arms (steel cops).........$70
Arm armor kit with leather cops......$35
|
Viking Leathercrafts
c/o Frank Ireson
1501 Stateford Road
Kingsport, TN 37664
(615)378-5071
|

Back to Early Period #3 |
Back to Early Period Index |
Back to PastTimes


