"...glittering at the top of their golden helmets wild boar heads gleamed, shining decorations, swinging as they marched..."
---Beowulf
One of the most exciting aspects of the early period warrior persona is the possibility of constructing a helmet which is not only utilitarian but also beautiful. During the 4th through the 8th centuries, the Romano-British, Angles, Jutes and Saxons all took great pride in their martial appearance as warriors. They decorated their weapons and armor with symbols from their beliefs and religions. Fabled swords and valuable helms were often given by grateful lords to the warriors who served them well.
The warriors and their weapons were lauded in song and epic poetry. The quotation above from the Anglo-Saxon "Beowulf" provides a good point from which to begin: for Beowulf sings of "glittering...shining" helmets which provide not only protection, but also serve as "decorations". Owen's Rites and Religions of the Anglo-Saxons says of the Sutton Hoo helm (probably the most widely known of the helmets of this period):
"The helmet bears a variety of symbols conveying pagan beliefs. In type it resembles helmets found in near-contemporary graves in Sweden, and like them owes its basic design to late Roman influence. It was probably an import, an heirloom of the Wuffing Kings, part of their Scandinavian, heathen heritage."
The Sutton Hoo helm is only one example of the helmets which have been found from this period, and that is why I believe this article will provide some food for everyone's imagination and result in some interesting new helmets which some bard might later sing or write poems about.
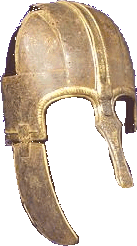
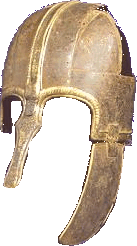
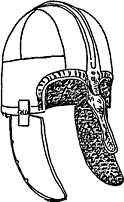
------------ "Coppergate Helm", referencing where it was found. Hall in The Viking Dig describes the find as follows:
"The helmet consists of four main elements. Its framework is made up of a broad band of iron encircling the head; the brow band, to which is riveted another band running from front to back over the crown. This in turn is attached to the brow-band by two shorter bands running over the ears and also riveted into the position. The four spaces between these various bands are filled by sub-triangular iron plates, once again held in place by rivets. The wearer probably protected his head and ears by donning a leather or woolen cap before pulling the helmet on, but this seems to have been a separate item of headgear since no trace of any protective lining remained within the helmet.
Two iron flaps, hinged to the helmet, protected the cheeks and could be tied in place below the chin. The back of the neck was defended by a length of iron mail, suspended from the lower edge of the brow-band and attached to the rear edges of the cheek-pieces to form a curtain of mail...
The brow-band had two semi-circles cut from it to form eye holes and these are decorated with brass edging to form eyebrows, embellished with a hatched design and terminating at either end in snarling, stylized animal heads. There is also a brass edging strip around the lower edge of the cheek-pieces. The eyebrows run together and downward to form a nose-guard or nasal, which is itself decorated with two interlaced animals...
Between the eyebrows is another animal head shown as if seen from above, with an extended, rounded muzzle, large eyes and incised shapes representing flattened ears. This animal head forms the end of raised twin decorative ridges, extending from nose to nape, which hold in place a brass strip bearing an inscription in Latin letters that were hammered into relief from underneath."
I've chosen to write about this helmet because it was constructed in a manner which can be replicated fairly easily, and, as you can imagine, it is quite a beauty. It is similar in design to the "spangen" helms common in the SCA. The wider bands over the top of the head cover more of the top surface of the helm, which means less rivets are required. Besides, the wide bands provide a wonderful surface form mounting decoration; I believe it is easier to build than a "spangen helm" and the main top piece is perfect for use with may of the helm styles of this period.
The Pattern
You will need the following pattern pieces for the helm top:
"A" Brow-band..............27 ˝" long x 3 ˝" wide
"B" Cross-band.............15 ˝" long x 3 ˝" wide
"C" Side-bands..............6 Ľ" long x 3 ˝" wide
"D" Sub-triangular plate....approx. 5" x 5" x 4" (cut 4)
"E" Cheek-piece.............approx. 6" long and 3 ˝ " wide with tapering cheek-piece shape (cut 2)
(see Figure 1 for patterns for pieces D and E)
This helm can be made of 16 gauge hot or cold rolled steel. First draw the pattern pieces to size on posterboard. Use the posterboard pieces to transfer the patterns to your steel and then cut the steel pieces out. Your next step should be to file all the edges for pieces A, B, C and E using a "mill file" or medium cut "bastard file". Use a vice to hold the pieces as you file and remember it is always easiest to file the pieces while they are flat, and an ugly edge cannot be fixed once the helm is riveted together!
The next step is to polish each piece. At the very least give each piece a pass on the wire brush wheel of your bench grinder. If you want a fine finish, get some cotton buffing wheels, steel polishing rouge and Tripoli compound form your local hardware store. Use the rouge and then the Tripoli compound on each side of the steel pieces which will face outward on your finished helmet. Another really good polishing compound is "Lea" available through Allcraft (see sources).
Now you are ready to start. Shape the brow-band "A" into a circle. I use a rubber hammer to curve the steel around a piece of railroad track. Take care to bend the steel gradually and try not to crease it. If you do get a crease, planish it out. Planish is a metal-working term meaning to smooth the metal with a uniform and overlapping series of hammer blows. A rubber hammer is often sufficient for this and will not mar the surface of the steel as a metal hammer will. A wooden hammer with a large head and a flat face will also do a wonderful job. The size and weight of the planishing hammer, the flatness and curve of its polished surface and the force of the blow all determine the shape and extent of the facet, i.e. the mark the hammer leaves on the metal. If the rubber or wooden mallets don't do the job, use a ballpean hammer as a last resort. Remember to cover the surface of the steel in a uniform manner with your hammer blows. Try to strike the steel right next to the last place you hit it. Control of the hammer is more important than the force of the blow. Strike with sufficient force to accomplish the task, but no harder. Do not rivet the ends of "A" together yet.Next we need to shape the crown band "B". first, dish the piece along its center line. To do this properly you will need a dishing hammer and a wooden stump, either hickory or oak. You can order a dishing hammer from Allcraft (see sources), or purchase a regular ballpean hammer and grind it down to a flat, rounded hammer face (the shape of a regular ballpean is too pointy). Your stump should have a flat face for planishing and also a small depression or dishing hole (it is probably easiest to have one stump for each). To dish the metal, place the area to be sunk or rounded over the hole. Then strike the steel over the hole with your dishing hammer. Again, you must move the hammer evenly over the area to be dished. When the piece is dished as much as you want, planish the same area using the flat surface of the stump. Planishing at this point should smooth out the high and low spots in the area you dished. Remember not to dish the "B" and "C" pieces too deeply. You want them to have a nice shallow curve which will match the helm top curve.
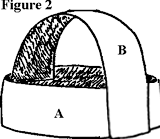
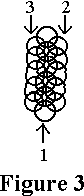
Piece "B" runs across the crown of the head from front to back (figure 2). As the top of the helm will be curved, "B' needs to be curved as well. Starting at one of the narrow ends of piece 'B', run a line of hammer blows down the center of the piece all the way to the other narrow end (fig. 2A). Now run another line of hammer blows just to the outside of the first line from one narrow end to the other, and do the same thing on the other side. The second and third line of blows should overlap the center one as shown in fig. 3. Try to keep the hammer blows evely spaced and uniform. Repeat this until the piece has a shallow curve, but be sure to leave 1 to 1˝" of undished metal on each long side of the piece.
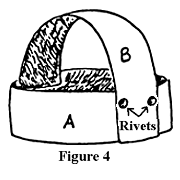
As you dish "B" the metal will stretch and the piece will begin to curve, try to use this to your advantage. Consult figure 2 to see how the curve should look. It is important to allow enough room at the edge of "B" when riveting it to the center of piece "A". This will be the front of the helm and will be the place where we will eventually cut the eyeholes. When you are ready, place your rivets above where the eyeholes will be when you cut them.(Figure 4)
The original helm has two rivets at the front of "B" and "A", and two rivets where the pieces join at the back of the helm. Be sure to shape "B" as close as you can to the way you want it to look before you rivet it to "A". When you are ready, mark the rivet holes and then punch or drill them on "A". Then mark and punch the matching holes on "B". Rivet them together. Use C-clamps to hold the metal pieces together. These clamps are probably one of the armorer's most important tools. They provide that extra set of hands you need to hold a piece in place for riveting and drilling holes.
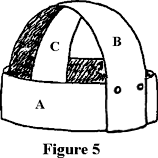
Once you have pieces "A" and "B" joined, you can start working on the "C" pieces. There is one for each side of the helm. Again, you will need to dish each side piece just like we did on "B". Carefully shape each "C" piece to fit between "B" an "A" midway back over the ears (figure 5). Don't rivet the "C" pieces in place until you have shaped them as close as possible to the way you want them on the helm. Don't' dish them too deeply. When you are ready, rivet them as above.
This is the beginning but there is still a ways to go yet. Part II will cover more on the construction and decoration of this most interesting helm.
Sources:
Tools can be ordered from
Allcraft Tool and Supply company, Inc.
100 Frank Road
Hicksville, NY 11801
1-516-1660 or 1-718-895-0686
For orders only phone 1-800-645-7124.
This is the tool catalogue for armorers and jewelers. The best selection of stakes and hammers, not to mention everything else you could ever dream of having.
Beowulf. Translated by Burton Raffel, New American Library, NY; page 32, line 302.
A wonderful source for early period warriors.
Owen, Gale R., Rites and Religions of the Anglo-Saxons. Page 116.
Everything you want to know about the Anglo-Saxon culture.
Hall, Richard The Viking Dig. the Bodley Head, London (pp. 38-39).
This is the book. Lots of good pictures of the helm.
Nichole, David Ph.D., Arthur and the Anglo-Saxon Wars. Osprey Publishing, London (Men-at-Arms Series #154).
this is a wonderful little reference book. It includes some great pictures of the coppergate helm.
 click on pattern to enlarge