 |
 |
 |
Tablet weaving is a technique for combining warp and weft threads to form a fabric and uses tablets or cards punched with holes to form the shed. If you find this confusing, ignore it and keep going. All will be made clear in time.
Tablet woven bands and fabrics go all the way back to the Bronze Age. They were used to form decorative bands as well as beginning strips for looms. On some fabrics, the tablet weaving continued down the selvedges forming a decorative edge as well. Collingwood's book has a good history of tablet weaving as well as a listing of extant fabrics, their dates and places of origin and their fiber. The book also contains examples of early period tablets of bone, wood and leather.
The easiest way to learn is by doing. It is also easier to explain if you can see what I am trying to tell you!
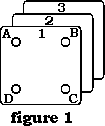
Purchase some cards (see Sources) or make your own by punching holes in 4" x 4" squares of cardboard as shown in Figure 1. Label the holes as shown. Whether you made your cards or not, number them from 1 to 10.
Now for the warp threads. Those are the ones you will be putting through the holes in the cards to form the pattern. Use heavy pearl cotton, embroidery floss (use all six strands together), heavy linen thread or dyed cotton cord. For your first experiment, you don't' want any thread that will stretch. Stay away from knitting yarn until you have mastered the technique, because it's stretch is disconcerting. You will need a dark color, a medium color and a light color.
For the sake of simplicity, from now on the instructions will use "D" for dark, "M" for medium and "L" for light.
Pick up card labeled "1" and working from the front side of the card (that is the side with the writing on it), thread it as follows:
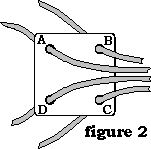
Put an "M" thread thru the hole marked "A", an "M" thread thru the hole marked "B", one through the "C" and another through the "D" hole. Look at Figure 2 if you are confused.
Thread the next four cards as shown below:
| 2. | "A"=D | "B"=L | "C"=L | "D"=L |
| 3. | "A"=L | "B"=D | "C"=L | "D"=L |
| 4. | "A"=L | "B"=L | "C"=D | "D"=L |
| 5. | "A"=D | "B"=L | "C"=L | "D"=D |
 |
 |
 |
| 6. | "A"=D | "B"=L | "C"=L | "D"=D |
| 7. | "A"=L | "B"=L | "C"=D | "D"=L |
| 8. | "A"=L | "B"=D | "C"=L | "D"=L |
| 9. | "A"=D | "B"=L | "C"=L | "D"=L |
| 10. | "A"=M | "B"=M | "C"=M | "D"=M |
Make sure the cards are still in numeric order. Tie a string around them to keep them from getting shuffled around.
When you are making up a pattern to use for tablet weaving or when you are looking at one in a book, it will be drawn on graph paper like the design shown in figure 4.
 |
 |
This is a drawn pattern or "draft" of the cards you ust threaded. The dashes at the top show which way the thread went into the card. The letters down the side show the holes and the numbers at the bottom are the cards. Compare the draft whith the instructions for threading and I think the pattern and the way you design one will become clear to you.
Make yourself a shuttle out of cardboard (Fig. 5). Wind about 6 feet of cord on the shuttel. The color makes little difference, since done correctly the shuttle thread or "weft" will only show a tiny bit at the edges. This is because tablet weaving is a "warp faced" fabric, that is the design is formed by the warp threads, the ones you threaded through the cards.
Back to the warp threads and pack of cards. At one end of the warp, pull on the strings until the ends all match and tie that end into a knot. Tie that end to a talbe leg or door knob (if using a door knob, make sure it is a door that recieves infrequent use!). Now from the other end, pull on each string to make sure it is taut. Keep the pack of cards tied together so they won't shift. When all the strings are taut, tie the other end into a knot. PUt a belt around your waist and slip the knot throuth the belt (figure 6). Sit down in a chair and move the chair back until the warp threads are taut.
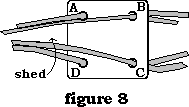
Pull the pack of cards toward you until you can reach them comfortably. An alternative method is to use two large C-clamps or pony clamps and attach them to either end of a table. Tie one end of the warp to one clamp and the other end to the other one (fig. 7). In either caseremove the string that ties the cards together. Check one more time to make sure they are in order and that all the printed sides are facing the same way. Move the cards back and forth on the warp and you will notice a space between the threads coming from the upper holes and those from the lower ones. This space is called the "shed" (figure 8) and you will be passing your shuttle from one side to the other through this shed leaving behind some of the weft thread to form the fabric. So now, pass the shuttle from left to right though the shed and leave the tail of your cord hanging out on the left side.
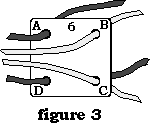
Now take the whole pack of cards and turn them one quarter turn away from you. The letters on the holes at the top should be "D" and "A". Pass the shuttle from right ot left and pull the weft thread taut. Use the end of the shuttle or a ruler to pack the threads toward your waist. Turn the cards 1/4 turn away. Pass the shuttle back to the right. Pack the threads. Continue turning the cards away from you, passing the shuttle and packing the threads until you have done 20 quarter turns. You should have 5 repeats of the pattern and it should look like figure 9 below. You should be able to see the pattern clearly and the letters on top should be "A" and "D".
 |
 |
 |
Note that the threads on the other side of the cards are twisting around each other in sets of four. This is caused by the turning of the cards.
This time turn the cards 1/4 turn toward you, pass the shuttle and pack as before and continue for 3 more 1/4 turns. You will notice that the pattern reverses. Try making diamond patterns by turning the cards four 1/4 turns away from you and 3 1/4 turns back.
You now know the basics of tablet weaving!
Problems:You will find some additional tablet weaving patterns by clicking on the link below. Keep practicing and soon you will have no reason to say you couldn't find the right kind of trim for a garment!
Next issue we will discuss double-face tablet weaving, which allows you to weave inscriptions, charted designs not limited by the number of holes in your cards and other marvelous things!
Sources:Try your local weaving shop or craft store. If that doesn't work, you can order them from:
