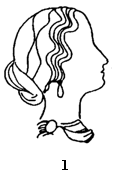
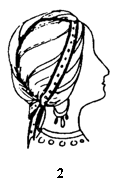
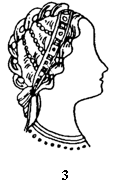
Compared to the elaborate construction of the later western Roman women, the hairstyles of Byzantium seem elegant and refined. A coin minted in Thessalonica in 324 A.D. shows a simple chignon with the hair parted in the middle and waved on the sides (Fig. 1). From the same year, a coin minted in honor of Helena (mother of Constantine) shows her hair pulled back from the face and secured with a jeweled headband. The long hair in the back appears to be brought up to form a loop over the headband at the front of the head (Fig. 2). Coins of the Empress Flaccilla (383-87 A.D.) and Eudoxia (400-404 A.D.) show a more elaborate hairstyle. The hair was parted in the middle and braided. The braids were brought forward over the crown to the forehead. Strands of pearls were laid in the waves at the temples and pearl headed pins were inserted in the braids to enrich them. The imperial diadem (a richly jeweled band of cloth) was bound over top of this (Fig. 3). From this evolved the most recognized of Byzantine styles, those of the Ravenna mosaics which show Empress Theodora and her court (6th century). Here the hair is pulled back from the temples, probably over a pad of false hair, and the back hair is braided and wrapped in a long oval on the back of the head. Ribbons, probably attached to the pad in the front, wrap over the front hair and are secured under the back braid. A jeweled diadem holds the ribbons in place. The empress wears an imperial crown on top of this (Fig. 4). This hairstyle has also been interpreted as a turban-like roll decorated with ribbons and pearls, with a small cap attached to the back.(See directions below). It is equally possible that the whole hairstyle was a wig, since wigs and hairpieces were very popular during early eras.
These are imperial hairstyles. Variations of them (different shapes of rolls with slightly differing decorations) were the fashion until the end of Byzantium.
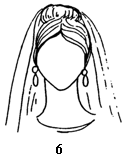
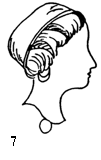
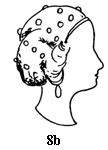
One popular method was to pile the hair on top of the head. place a coronet around it and cover it with a transparent veil (Fig. 6). Other styles were similar to Fig. 4 above, but with less decorative ribbon and simpler diadems. Sometimes the back of the head was covered with a cap (Fig. 7). A simple cap decorated with cords or pearls was probably popular for less formal occasions (Figs. 8a and 8b). Caps without trim but of the same shape would be good for commoners.
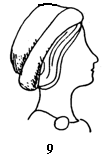
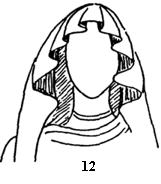
Norris shows a middle class cap made with a roll around the edge like the imperial hairstyle (Fig. 9). Eighth century commoners are shown wearing a veil over the head secured to a band or fillet (Fig. 10). A tenth century textile shows a Byzantine princess with her hair in long braids. This style could also have been worn by commoners. The ends of the braids were often fitted with jeweled or ornamented terminals to make them hang straight and for decoration (Fig. 11). This is probably the forerunner of the Norman hairstyle of the 12th century. Common women still wore the long veil over their heads, with or without a headband. Interesting is the type of fold found over the forehead (Fig. 12). This type of fold is from a semi-circular fabric, but the veil is usually described as being rectangular, and in depictions its ends are squared.

 Directions:
I. Figure 4:
To fake this hairstyle, you will need quilt batting, ribbon or trim, pearls or other trim as needed, scrap material to cover the roll and form the cap in the back.
Measure around your head at the hairline and add 12". Cut a piece of quilt batting that long and approximately 24 inches wide. Roll the batting to form a fairly tight roll (roll from one hairline measurement edge to another) (a). Secure the free edge with large stitches so that it can't unroll (b). Wrap the roll around your head so that it fits comfortably. Mark where the ends meet and cut off the excess batting. Stitch the two ends together to form a circle (c). To cover the circle, cut a rectangle of material as long as the outside circumference of the circle plus seam allowance and as wide as the diameter or the circle plus seam allowances. Pin the fabric to the circle with the seam allowances to the inside, and hand stitch down (d). Wrap ribbons around the circle at intervals and secure with stitches on the inside (see illustrations of headwear) (e). If you want to sew pearls on the edges of the ribbons, now is the time. To finish the cap, cut a circle of material 1" larger than the outside of the padded circle. Gather the edge so that you can fit it inside the padded circle. Stitch in place (f). To make the commoners version (Fig. 9), do not trim and use more "common" looking material.
II. Figure 8.
You will need about ½ yard of material (silk or substitute) and trims --pearls or gold cording.
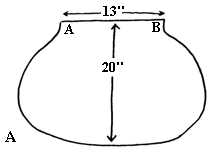
Using the pattern below (a), cut out a cap from your chosen material. If you are using pearls, sew them on in a pattern, staying well away from the seam allowances. You can add pearls at the edges after the cap is sewn together. If you are using gold cord, sew it to the piece as shown (b), taking the cord all the way to the seam
allowances. Sew a band of contrasting material from point A to point B and turn it under and stitch down (c). This is the front of the cap. Turn the rest of the edge of the cap under and stitch down to form a casing (d). Run a narrow elastic or a cord through the casing and fit to the head.
III. Figure 10.
Braid cases can fake a number or long hair styles for many periods. You will need some long pieces of scrap material, two fishing weights, some sort of stuffing material (polyester is good), and any decorations or ribbons you might want to add.
Cut a long piece of material approximately 3 ½" to 4" wide and as long as you want your cases to be (a). Sew up the tube, narrowing the bottom to a point and leaving the top open (b). If you have hair of shoulder length or longer, the top of the case should be just large enough to insert the end of your braided hair into. If it is too large, take it up. Turn the case right side out and drop a fishing weight into the bottom or the case. Don't get carried away with the size of the weight. You need just enough to help the braid hang straight. Stuff the case with polyester stuffing and trim as you wish. To wear the case, braid your hair and stick the ends into the top of the case. Sew the case to your braid with needle and thread (c). If your hair is shorter, attach the cases to a headband and wear a veil over it (d).
IV. Fig. 12
This is an interesting problem. The folds around the face are from a semicircular veil, but the rest of the palla appears to be rectangular and the ends are square. A shape similar to the one below could explain it.
 Sources:
Holum, Kenneth G. Theodosian Empresses: Women and Imperial Dominion in Late Antiquity. lln1versity of California Press, 1982.
Norris, Herbert Costume and Fashion: The Evolution of European Fashion Through the Earlier Ages. J.M. Dent and Sons, Ltd. 1947.
Wilcox, R.T. The Mode in Hats and Headdresses. Scribner, 1945.
Back to Early Period #5 |
Back to Early Period Index |
Back to PastTimes
