Practical Combat Footwear
Maistreas Aeruin ni hEarain o'Chonemara
Nearly everyone who fights runs into the same problems sooner or later. Technique problems can be best solved at fighter practice. Armor problems can be ironed out by the local armory. But how do you solve a problem with footwear? After many tries, some more successful than others, I was about to give up finding something small enough (some people have difficulty finding something large enough) when I came upon this solution that is used in Ansteorra--a sort of 'high-topped' Hushpuppy. Not only do they give you good traction, ankle protection and comfort (especially comfort), but they are inexpensive to build and can be decorated in a number of ways to look like boots from many cultures and times.
Building your own pair:
Step 1: Find a suitable pair of shoes (Fig. 1). Look for an inexpensive suede leather pair (around $12) with thick crepe soles that have been stitched in place around the toes, and with the shoe top and tongue stitched to the side pieces and covered by an additional stitched-on piece of leather that makes the seams stand up like small ridges. These last longer than the other types. Man-made materials that look like suede are okay; just stay away from smooth fake leather plastic, since it can't be dyed to match later.
Step 2: Get you materials together. A Tandy Plainsman Boot pattern is helpful if you don't have a good feel for pattern drafting. Otherwise, you won't need it. For making the patterns you will need paper bags for the pattern material, a tape measure, scissors, pencils and paper. For the actual boots you will need a punch awl, sewing awl and heavy waxed thread or rivets, 4-5 yards of latigo lacing or polyolefin thin braided macramé cord (don't' get twisted, it frays too much to use as laces), rubber cement, something to cut the leather with such as an exacto knife or heavy leather scissors, leather dye, whatever you are going to decorate the boos with (see following article), eyelets for the lacing holes, an eyelet setter, hammer and anvil, and of course some leather. After you have made your patterns, take them to the leather store to make sure you are buying enough leather for the project. Heavy suede splits are nice, but you could also use smooth leather.
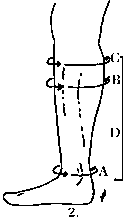
Step 3: Labeling A,B,C, and D, measure yourself for each leg (with your socks on):
A. The circumference of the leg at the ankle
B. The circumference of the calf at the largest part
C. The circumference of the leg at the place you decide will be the top of the boot
D. Distance from where you measured 'C' (the boot top) and the top of the heel
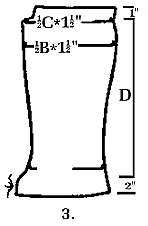
Step 4: Make your basic pattern parts. If using a pre-made pattern, simply trace it onto the brown paper and cut it out. Continue to read the instructions as they will tell you how to fiddle with it to make it fit. Otherwise, draw the tops as shown in Fig. 3. Notice how measurements A,B,C, and D are used to make your basic pattern.
The additional amounts are included to compensate for the overlaps necessary to assemble the boots. Cut out the top pattern. Now try to match the bottom edge of your pattern to the shape of the top of the shoe. Most likely you will need to tape the pattern to the shoe top and then draw on it so there is about a one-inch overlap at the top of the shoe. Remove the pattern and cut off the excess paper, then tape the pattern back onto the shoe. If the back edge of the pattern correctly follows the curve of your calf when you are standing, then your pattern is correct. If it doesn't, adjust the taped seam and probably the shape of the lower part of the pattern until it does follow your calf. Once this works for one-half the boot top, cut out another one just like it (trace onto brown paper and cut it out). Repeat the fitting process, but this time overlap the back edge of the pattern by 1" and tape. The paper will have a tendency to curl up a bit but that is normal. Match the center of your long taped seam with the back seam of the shoe. If all fits fine, you are in business!
One very important thing to remember is to allow for a 1¼" overlap at the front of both sides of the uppers pattern, as in Figure 4. This overlap will be used for sewing the boot tops and tongues together later. If you leave this out, you can't put the pieces of leather together to make the boot lace properly.
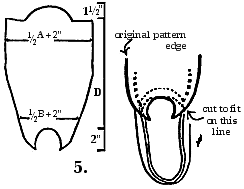
The boot tongue is thankfully a lot easier to draw than the upper sides. Note the use of measurements A, B, and D in Fig. 5. Once again, the extra amounts are for assembly use.
Tape the traced brown paper pattern to the tongue of the shoe. It probably won't fit, so once again you will need to draw in a curve that will fit that of the shoe, allowing for a 1" assembly overlap.
When you have adjusted the tongue to fit, put the shoe on again and see if the top of the paper tongue sticks up beyond the tops of the paper side patterns. It should, by about 1½".
By now, you should have a good idea of how you want your finished boot to look. This determines the shape of the shape of the next two pieces: the boot spine and the cuff.
The boot spine is something I discovered through my trials and tribulations with the falling-down moccasin tops. As the suede you are using is about the same thickness as most moccasin materials, you can bet it will try to droop around your ankles, too. However, I found that an additional piece of leather sewn down the back seam helps prevent this problem. The three seams in parallel strengthen the back enough to help stop the droop. To draw the spine pattern, draw a rectangle 1½" wide by [measurement 'D' +2"] long. Cut out the pattern, place it over the taped seam of he boot back and lengthen or shorten it as needed. The spine should start at the bottom of he upper side (so that it overlaps 1" like the side pieces ) and stops at the top. If you want a decoratively shaped spine, add onto this pattern making sure you mark the center back line.
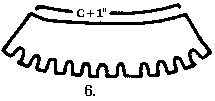
If your design requires a cuff, cut it out now. The top of the boot cuff should be drawn as in Fig. 6 using measurement 'C'. The rest of the cuff depends on what you want it to look like. Make sure the cuff matches the top edge of the boot side pattern. Remember to add 1" to the top of the cuff for sewing overlap.
Once you have made your patterns, you are ready to make an assault on your local leather store. Look for a piece large enough to cut out all four uppers and the tongues. Spines and cuffs can be cut from a different piece of leather but it would be better if everything came out of the same hide. If you decide to use a leather with a right and wrong side, make sure you don't' forget to make sure your patterns work for both the right and left boots (don't end up with three pieces of right boot and only one of the left).
Step 5: Armed with patterns, pencil and leather you are ready to trace your paper patterns onto the actual boot material. Be sure to do this on the back side of the leather only, protecting the front side from stray cut marks and checking for mistakes (like three right boot halves and one left). Try to follow the straight grain of the leather (it runs parallel to the animal's spine; if this idea seems strange have the person at the leather shop show you). This will result in a boot that doesn't stretch strangely because of the grain running on a diagonal with the pattern pieces. Triple check your pattern layout before cutting. Leather does not allow many mistakes to go unhidden in the final product. Label your pattern pieces on the inside of the cut leather (such as right inside, right outside) so you can match them up to the correct foot later.
Step 6: Assembling your boots will be easier than you imagined at first since you have already gone through the same basic steps with the paper patterns. The instructions were written with the idea that the pieces will be stitched together, however if you are riveting your boots together think 'punch holes and pound down rivets' whenever stitching is mentioned.
A. Using rubber cement, glue ½" back seams together (Fig. 7).
B. Pre-punch sewing holes for back of calf seam with a sewing awl. This seam should be centered in the middle of the two pieces of overlapped and glued leather. As before, the pieces will curl a little due to the shape of the calf curve.
C. Sew the seam together using the sewing awl. Start at the heel and finish off at the top of the boot upper. Now take a short breather and give your hands a rest for a moment.
D. If you have planned on decorating the boot uppers, spines or cuffs, now is the time. It is much easier to tool and decorate leather while it is flat than when it has been turned into a boot. When all the tooling work (or whatever else) is completed, take another break. All that creativity can be tiring!
E. Next, glue the decorated spine into place, with the center of the spine following the line of stitching that joins the two upper halves.
F. Pre-punch the sewing holes with the awl and then sew the spine in place. Maximum stability comes from stitching the spine to the uppers around the borders of the spine, set in about ¼" from the edge. It is best to start at the top, stitching down one side and up the other, and ending at the top so the knot isn't in an uncomfortable place later.
G. If your boots have cuffs, glue them to the top of the boots and then pre-punch the holes and stitch them in place.
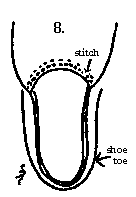
H. Glue the upper boot tongue to the tongue of the shoe making sure the upper tongue is outside the shoe tongue. Use a 1" seam and pre-punch, then sew the two parts together as in Figure 8.
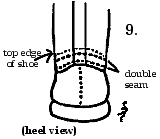
I. Matching the back seam of the shoe to the center of the spine on the upper boot, glue the upper to the shoe. Use a 1" seam and be sure the upper is outside of the shoe. Pre-punch the holes and sew in place as in Fig. 9. Notice the seam is a double seam. This is for strength. Have great patience with your sewing awl when you are stitching through the spine area of your boot; it is going through the shoe, as well as three other layers of leather, and consequently it is easy to break a needle if you are not careful. After you have attached the tongues and the sides of the shoes, take a long breather. You've earned it and your hands will need to rest up for the next step.
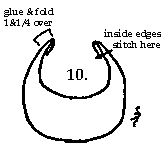
J. Of all the steps of assembly, this one is the most likely to cause a shift in your personal vocabulary. It is not easy, and must be done properly if you ever intend on lacing your boots without ripping out the lacing holes. Examine the strange view of the boot shown in Fig. 10. This is the view of the boot, looking toward the shoe from the boot top. Notice the tongue has been pushed down into the shape of the letter 'U' and that the rest of the boot curls up and over the edge of the tongue.
To glue the tongue to the sides, put rubber cement on both sides of the outside edges of the tongue, for about a 1¼" wide strip. You may need to cut small triangular pieces out of the bottom edge of the side pieces to make them fit into the tongue properly. Now, fold the edges of the side pieces over the edge of the tongue, making sort of a sandwich with the tongue piece in the middle. When everything matches up properly, pre-punch the holes with a punch awl and stitch in place with the sewing awl. Start at the bottom, nearest the sole and finish off at the top.
K. Using a good sturdy punch able to happily penetrate three layers of heavy suede (which means you use the one operated by a hammer unless you have hands like a gorilla and a titanium steel punch), punch out holes for lacing up your boots, Measure the intervals for lacing holes first and mark the hole spots with something you can easily see. Make sure the holes are consistent for each boot; you can get away with a little difference but try to keep them as close as possible to each other. Next, if you choose to, you can reinforce the holes with metal eyelets big enough to accommodate your lacing. Notice that the stitching is outside the lacing holes as in Fig. 11.
L. With the worst of the project completed, only two steps remain. Right now, you will probably have a two-toned boot with the uppers and the actual shoe of two different colors. Use a sponge or a little wooly dauber and some penetrating leather dye to dye both the shoe and the upper the same color. This may take two or three coats of dye, but eventually it will look as though the upper and lower parts of your new boots are made of the same material, and that you bought them that way on purpose. Be sure to let your boots dry between coats of dye.
M. Finally, make laces for you boots. Put your feet into them and stand up. To determine the correct lace length, start at the top of one side and cris-cross your way all the way to the bottom, including the lacing holes from the original shoe ad then go all the way to the top again before cutting anything (Fig. 12). If using polyolefin cord, it is best to heat seal the end with a match to keep the cord from fraying. Tighten the laces to your own taste and then cut your lace to the proper length. Make sure there is enough left over to make a good bow. Do the same for the other boot. For some reason they tend to come out a bit uneven and the laces for one boot may be too long or too short for the other.
And there you have it: your own pair of 'high-topped' Hushpuppies. To make them last longer protect them with a liquid silicon compound or mink oil. If you had to dye the tops and bottoms, expect them to fade onto your combat pants and socks for the first few wearings. Regular maintenance like scrubbing off mud or dusting them off after a particularly sandy site will help your boots last longer. And, you can say goodbye to heel blisters, stomped toes, drooping ankles, slick footing and slowed-down feet forever. Who knows, you may even get asked to make another pair for a friend suffering from the same complaint.
Maistreas Aeruin uses black walnut hulls for dyeing leather. Soak the hulls in alcohol for a couple of weeks and then strain. Use the colored alcohol just as you would a leather dye. The color varies from a grey brown to a brown black.
Back to Early Period #6 |
Back to Early Period Index |
Back to PastTimes

