The A-Tunic
The A-Tunic
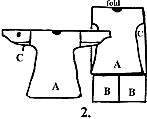
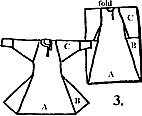
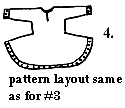
Most of you are probably familiar with the ubiquitous. T-tunic, the tunic of Rome, Greece and a lot of the barbaric tribes, as well as the Christian Copts (Fig. 1). Sometime around the fourth or fifth century A.D. the tunic with fuller skirts began to be seen in Europe. This may have coincided with the increase in horse riding, since wider skirts are more comfortable when riding. This tunic, which is usually referred to as the A-tunic, isn't really shaped like the letter A but looks like a T tunic with a flared skirt. Here are some historical examples and their probable cutting patterns: Fig. 2 shows a shirt in the A shape from Egypt (6th century A.D.); Fig. 3 is part of the coronation garb of the German Emperors (900-1100 A.D.); Fig. 4 is an Anglo-Saxon A-tunic.
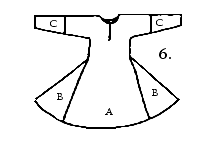
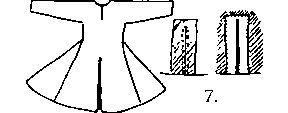
The best way to draft your A pattern is to begin with an old long-sleeved shirt (mundane variety). Try the shirt on and mark your natural waist line. Remove the shirt, button up the front and lay the shirt on your pattern material (butcher paper, brown wrapping paper or newsprint will do nicely). Follow the drawing in Figure 5, widening the skirts of the tunic at the marked waist as shown. Use the excess to make gores to widen the skirts and to lengthen or line the sleeves or both. Remember that fabric was expensive and not to be wasted. Try to plan your pattern to have as little left-over material as possible. To construct, sew the sleeve lengthening pieces (if used) to the ends of the sleeves. Sew the side gores to the skirt of the tunic. Sew up the sides and sleeves. Add your gussets under the arms if necessary. (If you can't raise your arms, it is necessary! They are almost always needed on tunics worn by fighters to keep the tunic from ripping under the arms. If you haven't' put in gussets before, see the directions in the "Gussets" article in this issue. At this point you will want to even out the bottom of the skirts to form a gentle curve before you hem it. To slit the skirts of the tunic for riding either split the front section of the pattern or simply cut a slit and line (Fig. 7). cut a piece of material for the facing about 2"-3" longer than the slit is to be. With the right sides of the material together, sew up one side of the slit and down the other. Cut the slit carefully and turn the facing the wrong side. Trim, turn the edges under and slip-stitch it down. Use the same procedure for a slit neck opening. The cut of the neckline depends on the period and culture, but you are usually safe with a rounded neckline and front slit.
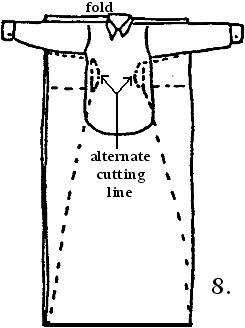
The A tunic shape was also worn by women. Figure 8 shows how to cut and use the excess fabric for gores in the skirt. If you wish the chest area to fit tighter, you can use the alternate cutting line (_._._._) and put eyelets and lacing in the center back seam or on one or both side seams. Construct as for the men's tunic above. See the Anglo-Saxon clothing article for more cutting ideas.
Sources:
Harte, N.B. and Ponting, K.G., ed. Cloth and Clothing in Medieval Europe. Heinemann Educational Books, 1983.
Kohler, Carl A History of Costume. Dover, 1928.
Owen-Crocker, Gale R. Dress in Anglo-Saxon England. Manchester University Press., 1986.
Norris, Herbert Costume and Fashion. Vol. I. J.M. Dent, 1924.
Payne, Blanche History of Costume. Harper and Row, 1965.

Back to Early Period #6 |
Back to Early Period Index |
Back to PastTimes

